Skip to Content
 

[GDS] February 2011 Game Design Showdown - "The Dice Gods Must Be Crazy" - Entries #21 - #30

10 replies [Last post]
sedjtroll
sedjtroll's picture
Offline
Joined: 07/21/2008

To facilitate reading almost 40 entries this month, I am breaking them up into groups of 10. This thread is for entries 21-30.

Entry #25 World War Dice has been updated - pictures added (they had gone to my spam filter) Entry #24 Dice Defense has been updated - formatting
Entry #30 Plunder on the Horizon - formatting

sedjtroll
sedjtroll's picture
Offline
Joined: 07/21/2008
Entry #21 - Gobble

Gobble

A dice game for 2-6 players

Play time:

5-10 minutes

Contents:

36 dice
18 Cards
- 16 Target cards, numbered 2-17
- 2 Target cards, marked with an X
1 rule sheet

Object of the game:

The winner is the player with the most points at the end of the game.

Setup:

Shuffle the cards and place them in the center of the table. Each player is given six dice; any extra dice are put into the middle. These dice form the Pool.

Gameplay:

Each player chooses to roll between one and three dice and all players do so simultaneously. Once the dice are rolled, turn up the top card of the Target deck. The player whose dice total is nearest to the number revealed is Gobbled and has his or her rolled dice go to the Pool. If two or more players tie for closest, they all are Gobbled. All other players score the total of their rolled dice.

If any player rolls exactly the number revealed on the Target card, that player is safe and all other players are Gobbled instead. In addition, that player takes dice equal to the number he or she rolled that turn from the Pool.

In the event of an X being revealed, all players score and get a die from the Pool. In the event of there not being enough dice for everyone, dice are distributed to those with less dice first. If two players would qualify for the last die, it stays in the Pool. Note that this allows players who are out of dice get back in the game.

All cards should be left face up on the table in a line once revealed to allow for some Target card metagaming in the late game. This should influence whether that player rolls lots of dice to score more points per roll or less dice to avoid (or aim for) the remaining Target cards.

Ending the Game:

Whenever there is only one player left with dice, that player immediately scores 3 points for each remaining die and the game ends. If there are two or more players with dice remaining after the last Target card is revealed, they all score 3 points for each remaining die and the game ends.

A Note:

As this game is very simple and abstract, but has elements of stealing and being caught, it can easily be prodded into themes such as rival cat burglars, pirates, Viking raiders, the Mongol hordes, or anything of the sort simply by renaming the Target cards, the Pool, and the act of being Gobbled.

sedjtroll
sedjtroll's picture
Offline
Joined: 07/21/2008
Entry #22 - Shooting Gallery

Shooting Gallery

2-4 players 10+ minutes

Pop. Pop. Ding! Another target goes gown. "We have a winner!" Barks the carnival man.

Overview

Welcome to Shooting Gallery. Players are shooters at a carnival shooting gallery competing to to be the first to knock down a certain number of targets to win the prize. The game is played over several rounds with players using their dice to aim and shoot at targets. The shooters can use powers from targets they have already hit to get a better shot at the targets to knock them down and claim them.

Components

17 cards
- 1 First Shooter card
- 16 Target cards

24 dice (4 colors / 6 dice per color)

Setup

Each player takes one set of dice of any one color.

The target cards are shuffled and laid out face up in a 4x4 grid.

Randomly select a single player to be the first shooter before the first round.

Game Play

Shooting Gallery is played in rounds. During each round players will perform the following steps:

  1. Roll Dice
  2. Determine First Shooter
  3. Aim and Shoot

1. Roll Dice

Simultaneously, all players will roll 3 of their colored dice. If a player doesn't have 3 dice available, they must retrieve one or more of their dice from the cards on the table until they have 3 to roll. The dice rolled are then left on the table for all to see.

2. Determine First Shooter

The player with the lowest total value of dice will become the first shooter and claims the first shooter card. In case of a tie, the person closest to the first shooter in clockwise order will become the first shooter.

3. Aim and Shoot

Starting with the First Shooter and proceeding clockwise, each player will attempt to hit a target. This is done by taking 2 of the dice and designating them as the coordinates of the shot and placing the third die as the value of the hit on the appropriate card in the grid of cards.

The coordinate of a hit is designated as x,y with the lower left card as coordinate 1,1 and the upper right card as 4,4.

To place a hit you must observe the following rules.

  • You may activate any powers of cards that currently have one of your dice on it. Each card may only be used once.
  • To replace a die on a card, you must exceed the value of the die currently on it if there is one. The replaced die is returned to it's owner.
  • If you place a 6 on a card, you claim it and remove it from the grid of cards leaving an empty hole. It's power is no longer available and any shots that would normally have hit are now misses.

If you cannot place a die, you miss and pass your turn

Continue

If a shooter has claimed enough targets to claim victory, the game ends. Otherwise, play another round starting at step 1 again.

End Game

The game ends when one player accumulates enough cards for victory. That player is declared as the winner. In the case of a tie, the player closest to the First Shooter in clockwise order is the winner.

The number of Target cards required to claim victory is based on the number of players:
2 players: 7 cards
3 players: 6 cards
4 players: 5 cards

Specific Rules about Target Powers

The following rules apply to the powers of the Target cards:

  • +/-x: All +/- values adjust the die by exactly the amount indicated. Values of the adjustments are applied by turning the die to the appropriate facing so the value may not go below 1 or exceed 6. If they cannot be adjusted by the exact amount no adjustment is made.
  • Flip: The die is flipped to the exact opposite face that is currently showing. 1 becomes 6, 2 becomes 5, 3 becomes 4, etc...
  • Turn: A die is turned to a facing adjacent to the one currently showing. For instance, 1 can become: 2, 3, 4, or 5.
  • +1 Die to roll: Pick up a die not included in your initial roll and roll it. If necessary retrieve a die from one of the target cards to do so. Despite having extra dice, you will only make one hit.
  • Swap: You may trade any die you have rolled with any one of your own dice on a Target card.
  • Replace: You may replace a die on a target card even if it's value is higher than your own die.
  • Reroll: Reroll one of your rolled dice.
sedjtroll
sedjtroll's picture
Offline
Joined: 07/21/2008
Entry #23 - Head to head

Head to head (The game of winning butts)

Get your heads out of the gutter. This is a game of wooing. Every spring the sounds of love echo through the rocky peaks as the newly mature goats of last spring gather to sew their wild oats, and by love I mean deafening break-neck, loser-eliminating skull-on-skull action where only the strong “survive”.

Number of Players: 2 per set.

Object of game

To be the last player with any goats (dice) left.

Components

14 Dice:

  • 2d6 (yellow)
  • 2d8 (blue)
  • 4d10 (blue)
  • 4d12 (red)
  • 2d20 (red)

18 Mini-Cards X2 (one set of cards per player):

  • Yellow -1, -2, +1
  • Blue -3, -4, -5, +2, +2
  • Red -7, -8, -9, +3, +3

Setup

Divide the cards and dice evenly between both players (each player gets 1d6 (Y), 1d20, (R) etc...). Both players now roll all their dice and shuffle their cards. Both players now place their dice in front of them (as they landed, but in any order) and draw three (3) cards from their own piles.

Rules

  • You may only play cards on dice of the same color, whether yours or your opponents.
  • A player cannot choose to skip “butting” an opponent. Players must “butt” each turn.

Butting (combat):

The “butt-er” (attacker) rolls his/her die while the “butt-ee” (defender) does not. The goat with the lowest number wins, HOWEVER, In order to eliminate an opponents goat you must roll 2 points LESS than that goat has showing. After rolling, the “butt-er” may play as many cards as they like to alter the dice values, then the “butt-ee” may play as many cards as they like in response to the “butt-er”.

Example: Jane uses her red-d20 to “butt” Joe’s blue-d10 (showing a 9). She rolls a 12. Jane should lose this “butt” but instead she plays her red -8 card bringing her roll (temporarily) to a 4. Joe uses his blue -4 card bringing his die value (temporarily) to a 5. Since Jane didn’t beat Joe by at least 2 points neither goat is eliminated and the “butt” is now over.

Your turn

You must choose one of your goats (dice) to “butt” one of your opponents goats (Butt-er chooses both goats, Butt-ee just watches and bites their nails). After the “butt” is resolved you may draw back up to a hand of 3 cards.

NOW BUTT AWAY!!

sedjtroll
sedjtroll's picture
Offline
Joined: 07/21/2008
Entry #24 - Dice Defense

Monsters are invading the country! Use your towers (the dice) to fight the monsters and generate gold to buy more towers.

2-6 players 15-30 minutes

Components

  • 40 6-sided dice
  • 6 Village (sides: Blank, Gold, Hit, Gold, Hit, 2 Gold)
  • 6 Watchtower (sides: Blank, Gold, Hit, Gold, Hit, Hit + Hard Hit)
  • 8 Gold Mine (sides: Blank, Gold, Gold, Gold, 2 Gold, 2 Gold)
  • 8 Ballista (sides: Blank, Hit, Hit, 2 Hits, 2 Hits, 2 Hits)
  • 8 Cannon (sides: Blank, Hit, Hit, Hard Hit, Hard Hit, 2 Hard Hits)
  • 4 Wizard (sides: No Buy, Freeze 1, 2 Hits, 2 Hard Hits, Double Hits, Double Hard Hits)
  • 18 cards
  • 12 Monster cards
  • Each Monster card shows a number of Hit icons and Hard Hit icons, and possibly other modifiers (bonus gold, fewer rerolls, etc).
  • Also, each Monster card has a Splay line about two-thirds of the way down, and some of the icons on the Monster's card are below the Splay line.

  • 6 double-sided Player cards representing the players' castles

  • Both sides can be orientated to track a player's Damage (1-4 points), and both sides also have an Initiative number (1-6). But the card fronts have icons showing simple single-use special abilities. The later the turn order, the more powerful the ability. When a player uses his ability, he flips his Player card over, indicating it has been used. The abilities are: 1 Hit, 1 Hard Hit, 2 Hits, 2 Hard Hits, 1 Gold, 1 Repair (get 1 Damage back).

Setup

  1. Each player gets:

- 1 Player card (dealt randomly) - 1 Village - 1 Watchtower 2. Set out all 4 Wizards. 3. Set out Gold Mines, Ballistas, and Cannons according to the number of players: - 2 players: 4 of each - 3 players: 5 of each - Etc.

Extra dice and Player cards are not used.

Game Play

  1. Reveal a Monster card from the deck and Splay it on top of the previously played Monster card (if any). To Splay it, place it on top of the previous Monster card so that it doesn't cover up anything below the old Monster card's Splay line. The Hit and Hard Hit icons that are showing, both on this new Monster card and on any previous Monster cards, are what you need to roll in order to defeat this monster. All the visible icons are in play! In this way, the Monsters will always get tougher as the game progresses.
  2. All players simultaneously roll all of their dice.
  3. Set aside any you want to keep and reroll the rest.
  4. Set aside any of those and make one final roll.
  5. When you're done rolling, count up your Hits and Hard Hits and compare them to the Monster's icons. Hard Hits can count as either Hits or Hard Hits.
  6. If you have a special ability on your Player card that adds hits, you may flip your Player card to use that ability now.
  7. If you don't have enough hits, take 1 Damage by tilting your Player card 90 degrees counter-clockwise. If you take your 4th Damage, your castle is destroyed.

- If your ability repairs Damage, you may flip your Player card to use that ability now, rotating your Player card clockwise to show that 1 Damage was repaired. - The Wizard Tower is special. - "No Buy" prevents you from buying a tower this turn. - "Freeze 1" forces you to take one of your other dice and turn it to its Blank side. - "Double Hits" doubles the number of Hits you score using your other dice. If your other dice score no Hits, this does nothing. - "Double Hard Hits", like Double Hits, but for Hard Hits. 3. All players in Initiative order count up the Gold icons showing on your dice and buy one new die, adding it to your dice pool. - If your special ability adds gold, you may flip your Player card to use that ability now. - Gold Mines = 1 Gold. - Ballista = 2 Gold. - Cannons = 3 Gold. - Wizards = 4 Gold. 4. Repeat 1-3 until the Monster deck is depleted or a player's castle is destroyed.

Game End

Finish the round in which a player's castle is destroyed or the Monster deck is depleted. Each die you have is worth points:

  • Villages / Watchtowers = 0
  • Ballista = 2
  • Cannons / Gold Mines = 3
  • Wizards = 4 The surviving player with the most points wins!
sedjtroll
sedjtroll's picture
Offline
Joined: 07/21/2008
Entry #25 - World War Dice

World War Dice

OVERVIEW:

World War Dice is a dice rolling and set collection game for 2 to 4 players that plays within 20 to 40 minutes. Players form armies by rolling dice and battle over objective cards in order to collect higher scoring sets. The game ends when all objective cards have been claimed.

COMPONENTS:

  • 24 dice in total

    • 12 White dice
    • 3 Green Dice
    • 3 Blue Dice
    • 3 Red Dice
    • 3 Yellow Dice
  • 16 Objective Cards

    • 4 Tactical Objectives
    • 4 Strategic Objectives
    • 4 Financial Objectives
    • 4 Political Objectives (wild)

SET UP:

Shuffle the objective cards to form a draw deck and set the deck face down between all the players. Every player takes three white dice to use as their starting pool and rolls them. Determine a starting player and get ready for war!

PLAY AREAS:

To keep things organized, the table can be divided into areas. Set a space between all players for the Objective Deck and the, face up, contested Objective Card. Keep all inactive dice within reach but distinct from players’ dice pools. Each player should set aside space in front of them for captured Objective Cards, their Front Line of three dice, and the remains of their dice pool.

ORDER OF PLAY:

Players take turns clockwise around the table. Each turn consists of two phases, the Mobilization Phase and the Combat Phase. During the Mobilization Phase the current player will prepare their front line for attack and during the Combat Phase all players will take turns doing battle over the contested Objective Card.

Mobilization Phase

-Start your turn by turning over the top card of the Objective Card deck face up onto the table. This is the contested Objective Card.
-Roll all of the dice in your Dice Pool. You can set aside any dice you would like to keep and re-roll the remaining dice. You can roll this way up to 2 more times after your initial roll, for a total of 3 rolls. If die roll shows a Bomb symbol, then that die must be set aside and can not be re-rolled.
-You will now decide what you’ll send into combat. Choose three dice from your pool to be your Front Line. Choose wisely based on your opponents’ Front Lines and remember that Tank beats Anti-Air beats Plane beats Tank. The remainder of your dice pool will simply be set aside until your next turn.
-Now move on to the Combat Phase.

Combat Phase

The Combat Phase starts with each player deciding if they will lay claim to the contested Objective or not. The current player automatically lays claim and then each other player, going clockwise around the table, gets to decide to either sit out or contest the claim. If no other player contests the claim then the current player captures the Objective Card without a fight. If, however, the claim is contested by other players, then a battle will be fought to determine who will claim the Objective Card. Combat
All players who’ve laid claim over the Objective Card will take turns attacking each other starting with the current player and continuing clockwise around the table until someone wins the battle. Players who’ve sat out from the claim can not be the target of an attack. As the Attacker, choose a Basic Unit: Tank, AA Gun or Fighter Plane from your Front Line and target an opponent’s Basic Unit from their Front Line. If the attacking die (or dice) defeats the target die then the target die is Routed and set aside and the attacking die (or dice) is re-rolled and added back to your Front Line. If the target die defeats the attacking die then the attacking die is Routed and the target die is re-rolled. The result of the attack can be referenced below:

  • Tank VS Anti-Air Gun: Anti-Air Gun is routed
  • Anti-Air Gun VS Fighter Plane: Fighter Plane is routed
  • Fighter Plane VS Tank: Tank is routed
  • Same Unit VS Same Unit (ei. Tank VS Tank): Both are routed
  • Same Unit + Infantry VS Same Unit: target unit is routed
  • 3 Infantry VS Any Unit: target unit is routed

After the result of the attack has been resolved, the player to your left becomes the new Attacker. If an Attacker no longer has any valid attacks to make, then that player must retreat from combat. The last player to remain in the battle after all others have retreated has won the battle and claims the Objective Card.

Special Die Symbols


In addition to the 3 Basic Units there are 3 Special Symbols that can be rolled: Infantry, Bombs, and Stars. These special symbols can be used by the Attacker during combat, some instead of a regular attack, some in addition to and some in support of.

  • INFANTRY: Infantry symbols can be used in two ways. 3 Infantry can be used to attack and defeat any unit. Infantry can also be used to support an attack when attacking a Basic Unit using the same Basic Unit of your own. By supporting a unit, an attack that would normally result in both the attacking die and target die being routed will instead result in only the target being routed. When either attacking or supporting using Infantry, the Infantry dice are re-rolled along with any unit used in the attack.
  • BOMBS: If the Attacker has three bombs in their Front Line they may Bombard any claimed objective owned by any other player weather the player has sat out of combat or not. A bombarded objective is removed from the game and will not score. After Bombarding, the attacking player must retreat from combat.
  • STAR: Stars are wild. The Attacker may, before attacking, turn any die showing a Star to show any other face on the same die instead. Also, if a player’s unit is defeated in combat, the player may chose to route a die showing a Star instead, thus leaving the defeated unit untouched.

The Combat Phase ends once the Objective has been claimed and the player who claimed it has gained the appropriate die. Play then resumes and the next player starts his Mobilization Phase.

OBJECTIVE CARDS AND COLOURED DICE

Objectives come in 4 varieties of which their are 4 of each. 3 of these: Tactical, Strategic and Financial will reward the player with an extra coloured die when claimed. This die is added to the player’s dice pool along with any currently routed dice. The coloured dice have the same symbols on them as the white dice but in different distributions, as seen below:

  • Green (the Tank Die): 3 Tanks, 1 Infantry, 1 Bomb, 1 Star
  • Blue (the Plane Die): 3 Fighter Planes, 1 Infantry, 1 Bomb, 1 Star
  • Red (the Anti-Air Die): 3 Anti-Air Guns, 1 Infantry, 1 Bomb, 1 Star
  • Yellow (the Special Die): 2 Infantry, 2 Bombs, 2 Stars

Note: If one of a player’s Objective Cards gets Bombarded and removed from the game, the player keeps the die that was gained when the Objective was claimed.

GAME END AND SCORING

The game ends when the last Objective Card is claimed. Players start by forming sets of Objectives Card based on Objective type, Tactical, Strategic and Financial. Political Objectives are wild cards and can be used to try to complete any other set, keeping in mind that a set can never be of more than four cards. Players then score each set based on how many cards are in them:
1 card=1 point
2 cards= 2 point
3 cards= 4 points
4 cards= 8 points
Political Objectives may never form a set of their own, meaning any Political Objective card that is not part of another set will simply be worth 1 point.
After adding up their scores, the player who scored the most points is declared the winner.

sedjtroll
sedjtroll's picture
Offline
Joined: 07/21/2008
Entry #26 - Buy Low, Roll High

Buy Low, Roll High

*A light dice game for 2 – 6 players

Greed… is good. Also good: buying your stock on the cheap, selling it high, or even making it split. And then doing the backstroke in your Scrooge McDuck cash vault. Get to it, junior investor! The market waits for none!

Components

  • 40 Stock Shares (12mm d6)
    • 5 Stocks, 8 shares each. Faces:
      • check(s)
      • x(‘s)
      • stock icon
      • different face combinations for different stocks, creating a highly volatile tech company, steadily rising blue chip industry, stable mutual fund, etc.
      • overall, more checks than x’s.
  • Cash Disks ($1 - $5)
  • 12 Purchase Disks (2/player, identical backs)
    • Buy: 2 checks
    • Sell: 2 x’s
  • 6 Bond Disks, various values
    • face-up: purchase price
    • facedown: return price (somewhat higher)
  • 1 Starting Player Disk

Objective

As in the real stock market, the goal is cash! Buy and sell stocks, shift the market, and hedge your bets with well-timed bonds. Pursue either a diversified or focused strategy for hefty end-game bonuses.

Setup

Sort cash disks into piles of increasing value.

Sort Stocks and randomly value them, placing one group next to each cash pile (suggestion: roll one die per Stock, farthest away is most valuable) to form The Market.

Place Bonds next to the Market, purchase side up.

Each player takes $5 starting cash and his player disks, placing them in front of him. This is his Portfolio.

The player with the best shirt (ideally, French cuffs) takes the Starting Player Disk.

Gameplay

Phase 1: Bonds Mature (won’t happen 1st round)

Return any “mature” (return-side-up) Bonds to the Market; owning player takes the cash shown.

Flip purchase-side-up Bonds (i.e. acquired last round) to return side; they will be returned next round.

Phase 2: Issuing Orders

Beginning with the Starting Player, and moving clockwise, each player does ONE:

  1. Place his buy or sell disk (facedown) next to one of the Stocks in the Market that doesn’t already have his other disk.
  2. Purchase an available Bond, paying for it and placing it purchase-side up in his Portfolio.
  3. Pass (ONLY if he has placed both disks). Once a player passes, he cannot issue further orders this round.

Note: players may place “sell” disks even if they have no shares in that Stock, or “buy” disks for Stocks they can’t afford, to alter their value, speculate, of bluff!

Continue until all disks have been placed.

Phase 3: Open Market

For each Stock, starting with the least valuable, roll the Stock’s Market dice. Flip player disks (if any), and add their results to the totals.

  • If there are more checks than x’s, the stock increases in value. Move it up one value pile, along with any player disks, and move the stock it replaces down.
  • If there are more x’s, it decreases in value. Move it down (as above, but in reverse).
  • If there are ONLY checks or x’s (Stock icons don’t matter), it moves TWO piles.
  • Otherwise, it stays put.
  • If a Stock at $5 would increase, it splits instead! Any players who own one or more shares of that Stock take a $5 bonus (even if they own multiple shares); it decreases to $3 (as above).
  • If a Stock at $1 decreases, it crashes. Players return their shares to the Market; it remains at $1.

Note: “Stock icon” faces are effectively blank; they are there for theme and to keep the game colorblind-friendly.

Phase 4: Selling and Buying

Proceeding clockwise from the Start Player, players now may sell one share and buy one share, as per the disks they placed. If you choose to do so, pay (or receive) the current value of the relevant Stock and claim (or return) a share. Either way, reclaim your buy and sell disks.

If a player opted to “sell” a Stock he doesn’t own, he receives no money.

If a player does not have sufficient cash to buy a Stock OR there are no shares of that Stock left, he acquires nothing.

If there are no empty Stock piles, pass Starting Player Disk left, and begin a new round.

Game End

If a Stock runs out of shares, even momentarily, the game ends (after players complete the round for the other Stocks).

Scoring

  • Cash: face value
  • Each share: current Market value
  • Bonds: face-up value
  • $2 per Stock type
  • Majority holding (5+ shares of one Stock): $6/Stock
  • Sole ownership (only player with shares of a Stock): $6/Stock, in addition to majority holding bonus, if any

Highest total wins!

Strategy

  • Deal-making, table talk, and bald-faced lying are allowed, and strongly encouraged.
  • Bonds are a way to safely generate cash, but in the mean time tie up capital.
  • There is great advantage to being the only seller amidst many buyers. Don’t be afraid to bluff!
sedjtroll
sedjtroll's picture
Offline
Joined: 07/21/2008
Entry #27 - King of the Nets

King of the Nets

King of the Nets is a game for two or four players which brings the strategy and pace of tennis anywhere.

Game Components

  • 24 (4 Sets of) PolyHedral Dice (4/6/8/10/12/20)
    • Yellow Dice, 1s Replaced with Tennis Ball Symbols
  • 18 Half-Size Cards
    • 4 Smash Cards (2 for each player)
    • 4 Volley Cards (2 for each player)
    • 4 Lob Cards (2 for each player)
    • 6 Rule Cards (covering: game rules, tennis, tennis scoring, singles play, doubles play, tournaments)

Overview

Players play individual or doubles tennis using traditional tennis scoring and six dice (4/6/8/10/12/20), or swings, to win each point. Players choose five Strategy Cards out of three types of cards – Volley, Smash, and Lob– which they can use each game to enhance their swings and offset their opponents strategy.

Instruction for Setup

Each players takes one set of PolyHedral Dice (4/6/8/10/12/20) and chooses 5 of their 6 Strategy Cards. Players each roll a die to decide who serves. High roll serves.

About the Cards

There are three types of strategy cards: the Volley, the Smash, and the Lob. Each card may be played after a swing (some on successful swing rolls, others on misses) to enhance players dice roll or to counter a previously played strategy card. Cancelling other players strategy cards works on Rock, Paper, Scissors relationship with no single card being the most powerful. Each player chooses five of the following six cards before the beginning of each game (cards are discarded after use and rechosen at the beginning of each new game).

  • (2) SMASH: On a successful Swing +3 or Cancel Lob
  • (2) VOLLEY: On an unsuccessful Swing +3 or Cancel Smash
  • (2) LOB: On an unsuccessful swing you return with a 3 or Cancel Volley

Gameplay

  1. The server (decided by dice roll) starts play without a dice roll. The serve is considered successful swing of 0.
  2. The reciever then choose one of their dice to roll their return. The quality of their return swing is determined by their roll. Once a dice is used it can not be used again until the point is completed. (example: Recieveing Player Rolls 1d4=3)
  3. Play continues with the players exchanging swings until a player is unsuccessful with their swing roll. (example: Server returns 3 by rolling 1d8=6, reciever returns 6 by rolling 1d12=7, server misses by returning 7 with 1d10=6)
  4. Player who missed may choose to loose the point, or they may use one of their Strategy Cards (limited to one use each, per game). (example: server uses Volley Card to add +3 to their unsuccessful swing making it 6+3=9 and continuing play)
  5. Play continues with the players exchanging swings, and using Strategy Cards until a player wins the point. (example: reciever returns 9 by rolling 1d20=13, server returns 13 by rolling 1d20=16, the reciever believes they will miss so rolls their lowest remaining die 1d6=2 and plays their Lob Card, Server cancels their Lob with a Smash and wins the point)

The above is just one example of a possible point. Players may go for quick wins using their best dice early or they may play a slower game starting with their lowest dice and building up. If players run out of dice on a point they are considered exhausted and can no longer return the ball. At the end of each point players get their dice back for the next point. Cards are used through the game and are only replenished upon the start of a new game. .

Doubles and Tournament Play

Doubles Play is similar to single player matches except the d4 is not used and each player chooses only 2 strategy cards for each game. Players may hold tournaments following traditional tennis rules for multiple sets within matches.

Winning the Game

Players win games by scoring points following the traditional Love, 15, 30, 40 scoring format of tennis. Players may choose to play only one game, multiple games, or tournament format.

sedjtroll
sedjtroll's picture
Offline
Joined: 07/21/2008
Entry #28 - Died in the Wool

Died in the Wool

2 – 6 Players

Components

  • 6 Dog Dice
  • 27 Sheep Dice
  • 18 Lead Dog Cards

Bring in the Sheep

It’s time to bring in the sheep, and your pack of shepherd dogs is ready for the job. Make the best use of the 3 lead dogs – Alpha, Bruno and Lucky – to guide the pack in rounding up more sheep than the other players.

Meet the Dogs

Each face on the dog dice will either be blank, show a “recruit another dog” icon, or show 1 or more sheep dice icons.

Alpha – This dog is the go-first and swing-for-the-fences type. He may not always gather sheep, but when he does they come in bunches.

Bruno – Very focused on the job, Bruno is the best dog for rounding up sheep and rarely returns empty-pawed.

Lucky – This playful pup tends to wait a bit before jumping into action, but usually brings along help from the other dogs in the pack.

Other Dogs in the Pack – These are your run-of-the-mill working dogs, trained to round up the sheep.

The Lead Dog Cards come in 6 sets of 3. On the back is a generic pattern showing a player’s color. The front specifies one of the lead dogs and references the same player color it has on its back. Each set includes 1 card for each of the 3 lead dogs.

Setup the Game

Each player gets a set of 3 Lead Dog cards. The Dog Dice are placed in the middle of the table, and the Sheep Dice are divided into 3 herds for the first round.

Setup the Sheep and the Dogs

The Sheep Dice are divided into 3 herds for the round:

  • Small Herd (N + 1): Consists of 1 more dice than the number of players in the game. (example: 3 dice for a 2-player game, 4 dice for a 3-player game ... up to 7 dice for a 6-player game)
  • Medium Herd (N + 3): Consists of 3 more dice than the number of players in the game. (example: 5 dice for a 2-player game, 6 dice for a 3-player game ... up to 9 dice for a 6-player game)
  • Big Herd (N + 5): Consists of 5 more dice than the number of players in the game. (example: 7 dice for a 2-player game, 9 dice for a 3-player game ... up to 11 dice for a 6-player game)

Each player plays 1 Lead Dog Card facedown next to each herd of Sheep Dice.

Gather the Sheep

Resolve each herd of Sheep Dice, starting with the Small Herd, then the Medium Herd, and finally the Big Herd, as follows ...

Flip all players’ cards for the herd face-up.

Players will go in the following order, based on the Lead Dog Card they played for the herd:

1. Alpha
2. Bruno
3. Lucky

If more than 1 player plays the same dog for the herd, the players with that same dog will each roll a Sheep Die until a player gets the 3-sheep side up – that player will go first with that dog. If more than 2 players were tied, the remaining players continue rolling their dice until the full order has been determined.

Starting with the first player in the determined order, each player takes a turn until the Sheep Dice in that herd have all been claimed. If the last player in the order has completed his/her turn and some Sheep Dice still remain in the herd, start over at the start of the order again.

On a player’s turn, he/she rolls the Dog Die that matches the Lead Dog Card that he/she played for that herd. If a “Recruit Another Dog” icon results, roll a new yellow “Other Dog in the Pack” die, and re-roll the lead dog’s die ... this can be repeated until all 3 yellow dice have been rolled for the player’s turn. If all 3 yellow Dog Dice have been rolled, then continue rolling the lead dog die until a blank or a sheep-icon side results.

Once only blanks and sheep icon sides are showing, the player may claim the number of sheep dice showing on the Dog Dice he/she rolled in the turn.

Count the Sheep

Once all 3 herds have been resolved, each player rolls all of the Sheep Dice he/she claimed in the round and counts the total number of sheep showing on their Sheep Dice.

That number is added to the player’s score.

When at least 1 player reaches a score of 50 sheep or more, the player that totaled the most sheep in the game wins.

Otherwise, continue by setting up the sheep and dogs for another round.

sedjtroll
sedjtroll's picture
Offline
Joined: 07/21/2008
Entry #29 - Zombie Blitz

Zombie Blitz! (ZB)

Player: 2-5 player (optional 1-player solo and 2-10 player team play game)
Time: 30 Min
Age: 8+

ZB is a 2-5 player cooperative game. During the game, players roll dice simultaneously to attack zombies marching towards human. When 16 zombies are destroyed, human wins the game. But when a zombie ran over the path, human lost.

Components:

Human Dice x 25 (D6)
Zombie Dice x 3 (1D8, 1D10, and 1D12)
Zombie Cards x 16
Land Tiles x 8

Setup:

  1. Place 8 Land Tiles horizontally one next another form a path in the middle of table. Tile on most right marks Starting Space or Space 1, and tile on most left marks Space 8.
  2. Shuffle 16 Zombie Cards face down, form a Zombie Deck, and place it next to the Path.
  3. Each player takes three D6 (dice). Four D6 in 2-3 player game.
  4. Place remaining D6 and three Zombie Dice next to Zombie Deck and form a dice pile.
  5. Player who has the worse hair style is Starting Player or Leader.

Begin:

Starting Player or Leader takes the first turn of the game, and each player continues to takes a turn in clockwise direction.

Turn:

At the beginning of a turn, if there is no zombie on path, leader must take Zombie Blitz (ZB) action (first turn of the game will always be ZB), otherwise he takes one of the following turn actions:

  1. Attack Zombie
  2. Tile Action If leader cannot take Tile Action, he must take Attack Zombie.

At end of the turn, player on Leader’s left becomes the new Leader.

Zombie Blitz (ZB):

Leader takes two D6 and roll until he receives a 7 or 11, and his turn ends immediate. Otherwise for every miss (a result other than 7 or 11), a zombie goes blitz by taking a card from zombie deck and initiate its [Live] action. After initiating its [Live] action, if it is not already on path, place it on Starting Space.

Only one zombie can occupy a space at any time.

When moving a zombie into a (target) space that is already occupied by another zombie, simply move the zombie on target space one space to the left. If the next space is also occupied by a zombie, continue to move zombies on other target spaces one space to the left until every zombie on path occupies a space.

Attack Zombie:

  1. Leader chooses a zombie on path as Target and takes a Zombie Dice based on Target’s Strength (8, 10 or 12).
  2. Other player (follower) who doesn’t have D6 on hand or chooses not to join the attack may take one D6 from dice pile to his hand. In 2-3 player game, maximum number of D6 a player can have on hand is four and three in 4-5 player game. When follower already has maximum number of D6 on hand, he cannot take a D6, otherwise, he must take one.
    • If dice pile runs out of D6, player can take D6 from Monopoly.
  3. Follower, who chooses to join the attack, and leader roll all dice on hands simultaneously in their own play areas.
  4. Each player’s roll result of one D6 or sum of two D6 must match roll result of Zombie Dice to deliver a successful hit. To complete a successful hit of one D6, place the D6 on Zombie card. To complete a successful hit of two D6, place one dice on Zombie card and other one in dice pile.
    • Player may deliver more than one hit in a single roll.
    • If leader is not able to make a successful hit, then take one zombie from zombie deck and initiate its [Live] action. After initiating its [Live] action, if it is not already on path, place it on Starting Space.
    • When number of dice on target’s card matches or exceeds target’s Hit Point, remove target from the game and move dice on target to dice pile.
  5. If roll result meets the tile loading requirement, player may choose to withdraw his successful hit(s) and load a tile with a D6 for future tile action. Leader can NOT load a tile without successful hit, but follower may load a tile with or without successful hit.
    • Each player may load one tile per turn.
  6. Return Zombie Dice to dice pile. All players take remaining D6 in front of themselves to their hands.

Tile Action:

Leader chooses a loaded tile and takes its action. After taking the action, move all D6 from tile to dice pile.

End:

When a zombie on Space 8 moves towards left outside of path, game ends immediately and human lost the game.

When all 16 zombies are removed from the game, game ends immediately and human wins!

sedjtroll
sedjtroll's picture
Offline
Joined: 07/21/2008
Entry #30 - Plunder on the Horizon

Plunder on the Horizon

“Ship off the port bow! Run up our flag, ready the cannons and prepare for battle!! There’s plunder to be had!”

Players are pirate captains looking to plunder the most gold from unsuspecting merchants before their fellow pirates beat them to it. After 5 ships are plundered, the player with the most gold wins!

PLAYERS: 2-4

TIME: 10-20 min

COMPONENTS:

12 standard d6
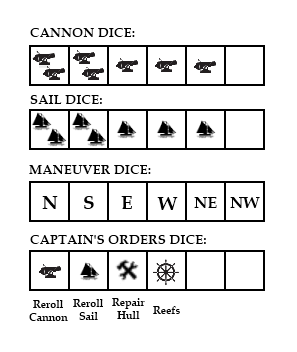
24 custom d6 (10 cannon, 5 sail, 5 maneuver, 4 captain’s orders)
18 cards (5 battle, 4 pirate ships, 9 merchant ships)

SET-UP:

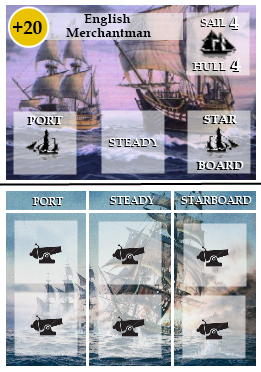
  1. Shuffle the 9 ship cards and place 4 of them aside. The rest form a draw pile. Place the top card in the center of the table. Place a d6 on each side of it for each player corresponding to the ship’s hull number. Place near it a battle card, 1 sail, 1 maneuver, and 2 cannon dice.

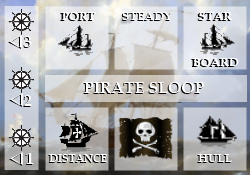
  2. Each player takes a pirate ship card, a combat card, 2 cannon dice, 1 sail die, 1 maneuver die, 1 captain’s order die, and 2 d6. Each places a d6 on the hull spot as a “6” and another d6 on the distance spot set to the merchant ship’s Sail #. Place the captain’s order die next to the “<3” on the player ship card.

GAMEPLAY:

Play is simultaneous. Players take their maneuver die (N, S, E,W, NW,NE) and choose a side. This determines both where their ship will move and how they will fire their cannons. If you chose:

N or S: place maneuver die(your ship) in the Steady zone of your ship card. Roll 1 Cannon and 1 Sail. Place in any 1 zone of your battle card.
E or W: place maneuver die in starboard (E) or port (W). Roll 2 Cannon (Broadside!) and place both in the same zone (any).
NW or NE: place maneuver die in port or steady (NW) OR in starboard or steady (NE). Roll 2 Cannon and place in any two different zones.

A player then rolls the merchant’s maneuver die:
N or S: place in the merchant’s Steady zone. Roll 1 cannon and 1 sail and place both in Steady battle zone.
E: place in starboard. Roll 2 cannon and place them in the starboard battle zone.
W: place in port. Roll 2 cannon and place in port.
NE: place in starboard. Roll 2 cannon and place one in steady and one in starboard.
NW: place in port. Roll 2 cannon and place one in steady and one in port.

For each hit you rolled in the same zone that the merchant ship is located , lower its hull rating by 1 (use the merchant’s d6 closest to you). For each hit the merchant rolled in the same zone as your ship reduce your hull rating by one. If the distance is 2 or less add one damage. For each sail the merchant rolled add one to your distance die. For each sail you rolled subtract one from your distance die (add 1 if you maneuvered South).
If the distance reaches 7 the merchant escaped! Resume combat when the next merchant is drawn. If the distance reaches 0 commence boarding. You and the merchant roll a cannon die. Add number of hits rolled to your hull number. If your total is higher, you plunder the ship. Continue choosing a maneuver and rolling cannons and sails until the merchant’s hull is reduced to zero or is successfully boarded. The first to reduce the merchant’s hull to 0 or successfully board the ship plunders the ship and claims its gold. If tied both get the gold.
Draw a new merchant ship. Reset distance. Pirates repair 2 hull. Repeat combat with new merchant.
After 5 ships are plundered, the player with the most gold wins.

LOSING BATTLE:

If your hull is reduced to 0 or you lose boarding you must sit out combat until the next merchant is drawn. Reset your ship like the start of the game. You lose the gold from the most recent merchant you plundered.

CAPTAIN’S ORDERS:

These are special actions you can take during battle. You start off with 3. Move the CO die down the scale each time you use it. If you failed to plunder the merchant you may move it up by one (max 3) when a new ship is drawn. You may use only one CO per roll. The 4 CO are:
Reload: Re-roll 1 cannon
Maneuver: Re-roll 1 sail
Repair: Increase your hull by 1
Reefs: Place in a battle zone. If the merchant moves into this zone it takes one damage. Remove after 1 roll.

PIRATE HUNTER:

Always sails toward you (N or S roll)!

2-PLAYER DUEL VARIANT:

Duel your fellow pirate! Place Maneuver die and roll in secret.

Syndicate content


forum | by Dr. Radut